![]()
The Cisco Nexus NIC GM (formerly ExaNIC GM) is a combined Precision Time Protocol (PTP) Grandmaster and ultra low latency network card. The device is packaged in a PCIe network card form factor with twin SFP+ ports. Both SFP+ ports 0 and 1 operate as low latency network interfaces. Port 0 additionally functions as a hardware accelerated PTP Grandmaster.
NIC GM Device installation
Installation of the NIC GM is almost identical to other Cisco Nexus SmartNIC (formerly ExaNIC) devices. This page should be used in conjunction with the SmartNIC Installation section. Once the device is installed as above, connect the GPS SMA to an externally mounted GPS antenna, one preferably with an unobstructed view of the sky. Proper cable, grounding techniques, and lightning arrests should be used. Do not mount the antenna near obstructions such as a wall or obstacles blocking part of the sky.
A second SMA marked PPS can be connected for 1PPS/10MHz connections to allow synchronization. The behavior of this connection is configurable and is covered here.
PTP traffic will be served out of the first port of the NIC GM card. (Refer to the below picture to identify the first port.)
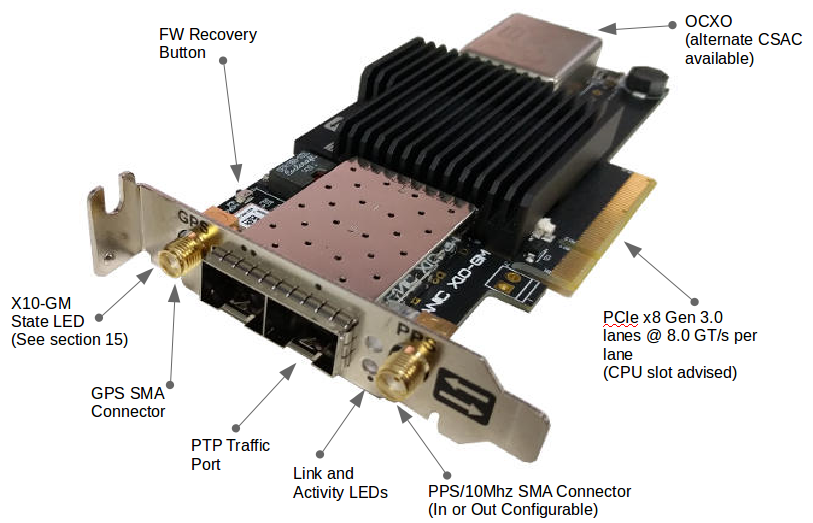
NIC GM Components
Software installation
Software installation of the NIC GM is identical to that of other SmartNIC devices. Please refer to the SmartNIC Installation guide for details. Note that the first driver software to support the NIC GM is 1.8.0.
After installation
Assuming installation completed successfully, verify that the
exanic-config utility works and reports the hardware type and function
of the NIC GM PTP grandmaster:
$ sudo exanic-config

Device exanic0:
 Hardware type: ExaNIC GM
 Board ID: 0x00
 Temperature: 64.2 C VCCint: 0.94 V VCCaux: 1.85 V
 Function: PTP grandmaster
 Firmware date: 20170728 (Fri Jul 28 00:36:12 2017)
The exanic-config utility can be used to inspect diagnostic information about the card and SFP modules. Its general use is covered in more detail in the SmartNIC Configuration Guide.
The exanic-config PTP status
The exanic-config utility can be used to inspect extended diagnostic
information about the PTP configuration and status. For example:
$ sudo exanic-config exanic0 ptp status

Device exanic0:
  PTP grandmaster: enabled
  Synchronize to GPS time: enabled
  Hardware time: 2017-08-01 00:32:10.145673160 TAI
                 2017-08-01 00:31:33.145673160 UTC
  TAI-UTC offset: 37s
  MAC address: 64:3f:5f:01:2D:68
  PTP configuration:
    Ethernet multicast: off
    IPv4 multicast: on
    IPv4 unicast negotiation: off
    IPv4 address: 172.17.11.228
    PTP domain: 0
    PTP priority 1: 128
    PTP priority 2: 128
    Multicast announce interval: 1 (2s)
    Multicast sync interval: 0 (1s)
    Announce receipt timeout: 1 (2s)
    One-step or two-step clock: one-step
  GPS configuration:
    Antenna cable delay: -23ns
  GPS receiver status:
    Fix type: 3D fix
    Number of tracked satellites: 13
  Clock status:
    Sync state: synced
    Estimated clock accuracy: 8ns
  PTP grandmaster status:
    PTP port state: master
    Number of unicast clients: 0
    PTP packets sent: 2349
    PTP packets received: 73
The exanic-config utility will either accept the Linux interface name
(e.g. eth7) or the device name of the SmartNIC device (e.g. exanic0
for the first SmartNIC in the system by PCI ID, and exanic0:0 for the
first port of that card).
The Hardware time is reported to the user in Co-ordinated Universal Time (UTC) and International Atomic Time (TAI), and all PTP network traffic is in TAI. The current offset between TAI and UTC is also displayed.
Note
The underlying time standard used by PTP is the International Atomic Time (TAI) standard, which at the time of writing is 37 seconds ahead of the Universal Coordinated Time (UTC) standard. PTP traffic will be in TAI time, not UTC time. Applications that make use of SmartNIC timestamps will need to be aware of this. Recent kernels are aware of the UTC-TAI offset, and this can be queried using adjtimex().
PTP Configuration
The exanic-config utility also provides methods for configuring the
NIC GM as a PTP grandmaster. To access a list of the PTP configuration
commands execute:
$ sudo exanic-config exanic0 ptp --help
exanic-config version 1.8.1
Detailed PTP grandmaster configuration and status:
   exanic-config <device> ptp status
   exanic-config <device> ptp { enable | disable }
   exanic-config <device> ptp ip-address <addr>
   exanic-config <device> ptp show-profile
   exanic-config <device> ptp profile { default | telecom | none }
   exanic-config <device> ptp { one-step | two-step }
   exanic-config <device> ptp eth-multicast { on | off }
   exanic-config <device> ptp ip-multicast { on | off }
   exanic-config <device> ptp ip-unicast { on | off }
   exanic-config <device> ptp gps-sync { on | off }
   exanic-config <device> ptp domain <value>
   exanic-config <device> ptp priority1 <value>
   exanic-config <device> ptp priority2 <value>
   exanic-config <device> ptp announce-interval <value>
   exanic-config <device> ptp sync-interval <value>
   exanic-config <device> ptp announce-receipt-timeout <value>
   exanic-config <device> ptp antenna-cable-delay <value>
   exanic-config <device> ptp save
Note after configuring the desired PTP configuration for it to remain persistent over a power cycle it is required to save the setup to EEPROM using the PTP save call. For example:
$ sudo exanic-config exanic0 ptp save
Enabling or Disabling the PTP stack
Normally the NIC GM operates as a PTP grandmaster serving out the PTP protocol, however it can be configured to suppress the PTP behaviour to allow operation as a normal NIC or to allow a different grandmaster to control the network. To disable the PTP stack on the NIC GM execute:
$ sudo exanic-config exanic0 ptp disable
Supported values are enable or disable.
MAC and IP addresses
The NIC GM provides 2 interfaces for the host, each of which has a MAC assigned at the factory, and can have an IP address set by the host. The CPU within the NIC GM that handles the PTP stack also has a MAC assigned at the factory, and needs to be assigned an IP address by the user for use on IP networks.
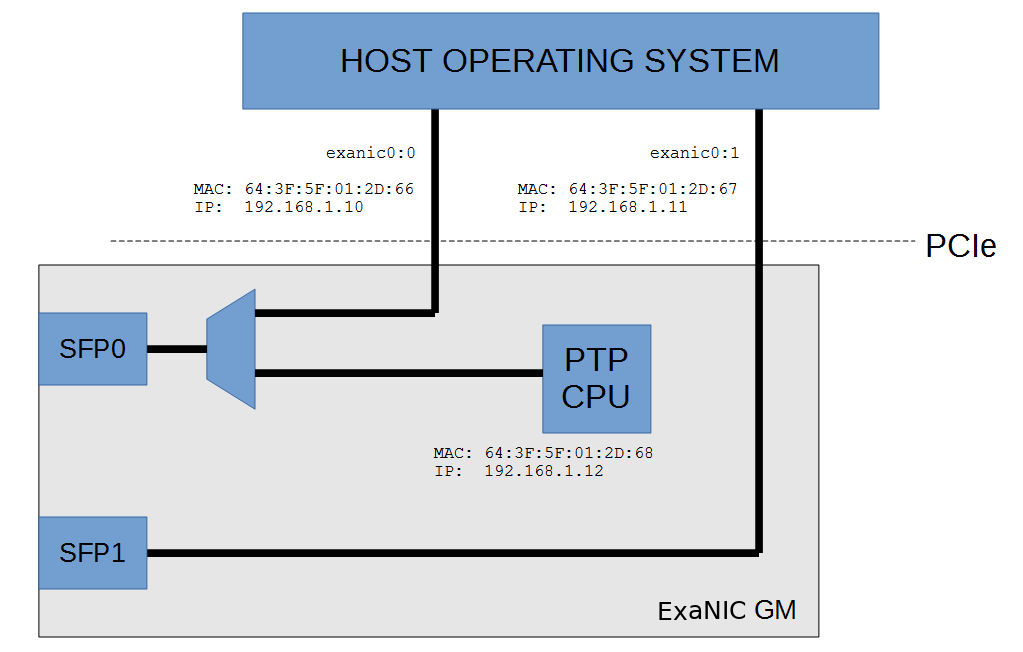
NIC GM Interfaces
To configure the IP address for the PTP stack:
$ sudo exanic-config exanic0 ptp ip-address 192.168.1.12
The IP address for the host interface is set using standard methods:
$ sudo ifconfig eth1 192.168.1.10
Don’t forget to save to EEPROM with exanic-config exanic0 ptp save
PTP Profiles
To simplify the configuration of a PTP network standard profiles were defined. These profiles include default values and acceptable ranges. To select and configure the NIC GM to one of the standard PTP profiles use the command:
$ sudo exanic-config exanic0 ptp profile default
The acceptable values are default, telecom and none. none
allows the operator to enter any values without restriction. To show the
current selected profile and ranges execute the command:
$ sudo exanic-config exanic0 ptp show-profile
Setting PTP one-step or two-step event messages
The NIC GM can be configured to use one-step or two-step event messages. That is, a sync event message that gets timestamped can either get an accurate timestamp placed in the message "on the fly" (one-step), or placed in a second follow up message (two-step).
$ sudo exanic-config exanic0 ptp one-step

$ sudo exanic-config exanic0 ptp two-step
Setting the PTP communication method
The PTP protocol can be configured to use several communication methods and management techniques. The multicast methods (IP and Ethernet) will configure the NIC GM to broadcast out PTP messages, whereas IP unicast will require the PTP clients to initiate connections.
$ sudo exanic-config exanic0 ptp ip-multicast on

$ sudo exanic-config exanic0 ptp eth-multicast off

$ sudo exanic-config exanic0 ptp ip-unicast off
It is suggested that ip-multicast be used to validate the network configuration before deciding on alternate communication methods.
Enabling or Disabling GPS synchronization
By default, the NIC GM utilities an on-board GNSS receiver (GPS) to tightly synchronize the NIC GM oscillator to GPS time from anywhere on the globe. An operator can however disable the NIC GM synchronization, this allows the NIC GM to be synchronized from alternate sources such as the Host PC.
To disable the GPS to oscillator synchronization execute:
$ sudo exanic-config exanic0 ptp gps-sync off
The acceptable values are on or off.
For best operation the NIC GM should be attached to an antenna installed
with an unobstructed view of the sky. This will result in a high quality
positional and time sync lock, and can be confirmed by verifying “Fix
Type” is reported as “3D fix” when running exanic-config exanic0 ptp
status.
Configuring PTP best master priority values
A number of configuration fields are used by the NIC GM in the execution best master clock algorithm (BMCA). These are used in conjunction with quality and performance metrics of the NIC GM to determine which device should operate as a grandmaster on a particular network. The exanic-config application can be used to set the priority1 and priority2 fields to modify the priority of the NIC GM in best master clock identification decisions. For example:
$ sudo exanic-config exanic0 ptp priority1 127
$ sudo exanic-config exanic0 ptp priority2 1
The acceptable values are between 0 and 255, where a lower value is chosen over a higher value in the BMCA.
Configuring PTP grandmaster broadcast intervals
A number of configuration fields are used by the NIC GM to control timing of PTP protocol messages. These are used to manage announce messages as part of the best master clock identification and sync messages as part of time synchronization. The exanic-config program can be used to set these values to adjust the timing and traffic on the network. For example:
$ sudo exanic-config exanic0 ptp announce-interval 3
$ sudo exanic-config exanic0 ptp sync-interval -1
The supplied interval values are used to calculate the interval in seconds, using the formula 2x seconds, where X is the supplied value. For example an announce-interval of 3 equals 23 or 8 seconds and a sync-interval of -1 equals 2-1 or half a second.
The acceptable values are between -127 and 127, however PTP profiles set a minimum and maximum and these are respected.
Configuring GPS Antenna Delay
The GPS antenna delay can be configured to factor in the latency incurred by the length of the installed cabled between the GPS antenna and the NIC GM. Note - The provided value should be in nanoseconds and changing the value will reset the clock sync algorithm to apply the new value correctly.
$ sudo exanic-config exanic0 ptp antenna-cable-delay 20
Configuring PPS Output
The NIC GM includes a PPS connector that can be used as either an input or output. When operating in output mode a 10MHz or 1PPS signal can be generated, which can be used to synchronize the time of other devices that can accept the PPS input.
As this is available for other SmartNIC devices it is configurable through the exanic-config level commands, not the ptp commands.
Usage:
$ sudo exanic-config <device> pps-out { on | off }

$ sudo exanic-config <device> 10m-out { on | off }
For example:
$ sudo exanic-config exanic0 pps-out on
Note
The PPS utilizes 3.3V TTL, 50 ohm termination and by default a rising edge trigger. The NIC GM exposes a female SMA connector.
Configuring PPS Input
There is no specific configuration value for setting the NIC GM for PPS
input, instead the input is setup and utilized by the
exanic-clock-sync utility that manages the SmartNIC clock
synchronization.
The exanic-clock-sync program takes arguments in the form of one or
more <device>:<synchronization-source> pairs. The
synchronization source being one of either the host (host clock),
pps (pulse-per-second input) or exanicX (another SmartNIC device). For
example:
$ sudo exanic-clock-sync exanic0:pps exanic1:exanic0
If desired this can be placed in system startup scripts. A sample
init.d script is provided in configs/exanic-clock-sync.
NIC GM LED States
| LED State | NIC GM State |
|---|---|
| Solid Green | All OK (GPS Fix) |
| Green Flashing | Adjust (GPS Fix) or Warmup (GPS Fix) |
| Orange (R+G) Flashing | Holdover (No GPS fix) |
| Red Flashing | Re-sync in progress (GPS could be any state) |
| Solid Orange (R+G) | GPS sync disabled (GPS could be any state |
| LED Off | GM Disabled |
Packet counters
There is several packet counters used on the NIC GM. The first are those
packets sent by the onboard CPU handling the PTP stack. These are shown
in the ptp status command:
PTP grandmaster status:
 Number of unicast clients: 0
 PTP packets sent: 248
 PTP packets received: 73
The host driver will also report packets sent/received by the card related to host activity. For example, exanic-config reports the following:
$ exanic-config exanic0:0

Device exanic0:
 Hardware type: SmartNIC GM
 Board ID: 0x00
 Temperature: 58.6 C VCCint: 0.94 V VCCaux: 1.83 V
 Function: PTP grandmaster
 Firmware date: 20160805 (Fri Aug 5 07:08:15 2016)
 Port 0:
  Interface: enp1s0
  Port speed: 10000 Mbps
  Port status: enabled, no SFP, no signal, no link
  Bypass-only mode: off
  MAC address: 64:3f:5f:01:2D:66
  RX packets: 1254 ignored: 0 error: 0 dropped: 0
  TX packets: 914
This says that the host system has transmitted 914 packets and has received 1254 packets , and the CPU handling the PTP stack has transmitted 248 and received 73. Note that some packets such as broadcast packets would be received by both the host and PTP CPU.
Troubleshooting
Note all interface numbers, IP addresses and device names below are for example only. These may differ on your system.
1. Make sure the NIC GM port is configured to the correct speed e.g.
$ sudo exanic-config exanic0:0 speed 10000
2. Make sure the NIC GM has been assigned an IP address at the device level e.g.
$ sudo exanic-config exanic0 ptp ip-address 192.168.1.12
3. Make sure the NIC GM port is configured to the correct auto negotiation e.g.
$ sudo ethtool -s eth1 autoneg on
4. Is GPS connected? At boot time, the hardware clock on the NIC GM is at epoch time zero, or 1st Jan 1970. The NIC GM will not serve time onto the network unless GPS has been detected and a lock established, at which point the correct time is known. From then on, GPS can be removed and the NIC GM will fallback to its onboard oscillator.
In the case below, even though PTP is enabled, as the system has never had the time set via GPS (as can be seen with the year as 1970), it will be blocked from serving time.
$ exanic-config exanic0 ptp status

Device exanic0:
 PTP grandmaster: enabled
 Synchronize to GPS time: enabled
 Hardware time: 1970-01-01 00:01:00.769655540 TAI
 1970-01-01 00:00:24.769655540 UTC
 TAI-UTC offset: 36s
 MAC address: 64:3f:5f:01:2d:68
5. Confirm that the PTP port has been through the best master clock algorithm (BMCA) and is operating as the master. The NIC GM will initially report as listening while the BMCA is operating and passive if a better GM is detected on the network.
PTP port state: master
6. Look to see that exanic-config ptp status is reporting an increase in the number of ‘PTP packets sent’ e.g.
$ sudo exanic-config exanic0 ptp status

Device exanic0:
 PTP grandmaster: enabled
 Synchronize to GPS time: enabled
 Hardware time: 2016-08-07 23:51:38.225087568 TAI
 2016-08-07 23:51:02.225087568 UTC
…

 PTP grandmaster status:
 PTP packets sent: 39267
Note
The standard linux applications such as tcpdump can not be used to monitor the transmitted traffic from the PTP soft core.
Note
From firmware 20170728 the NIC GM ports can be configured with local-loopback. This allows the SmartNIC to internally loop the port 0 outgoing traffic back to port 0 Rx. e.g.
$ exanic-config exanic0:0 local-loopback on
This then allows the transmitted traffic to be confirmed by observing the received traffic with tools such as exanic-capture and tcpdump. Once validated remember to turn the local-loopback function back off.
$ exanic-config exanic0:0 local-loopback off
7. Look to see that the PTP slave system is receiving PTP traffic e.g.
$ sudo tcpdump -i eth1 port 319
This page was last updated on Dec-10-2020.